Using a Custom GPUDriver
Ultralight can emit raw GPU geometry / low-level draw calls to paint directly on the GPU without an intermediate CPU bitmap. We recommend this integration method for best performance when animating many paths / images.
Renderer-Agnostic Architecture
Ultralight is designed to be renderer-agnostic. All draw calls are emitted via the GPUDriver interface and expected to be translated into various platform-specific GPU technologies (D3D, Metal, OpenGL, etc.).
This approach allows Ultralight to be integrated directly with the native renderer of your game.
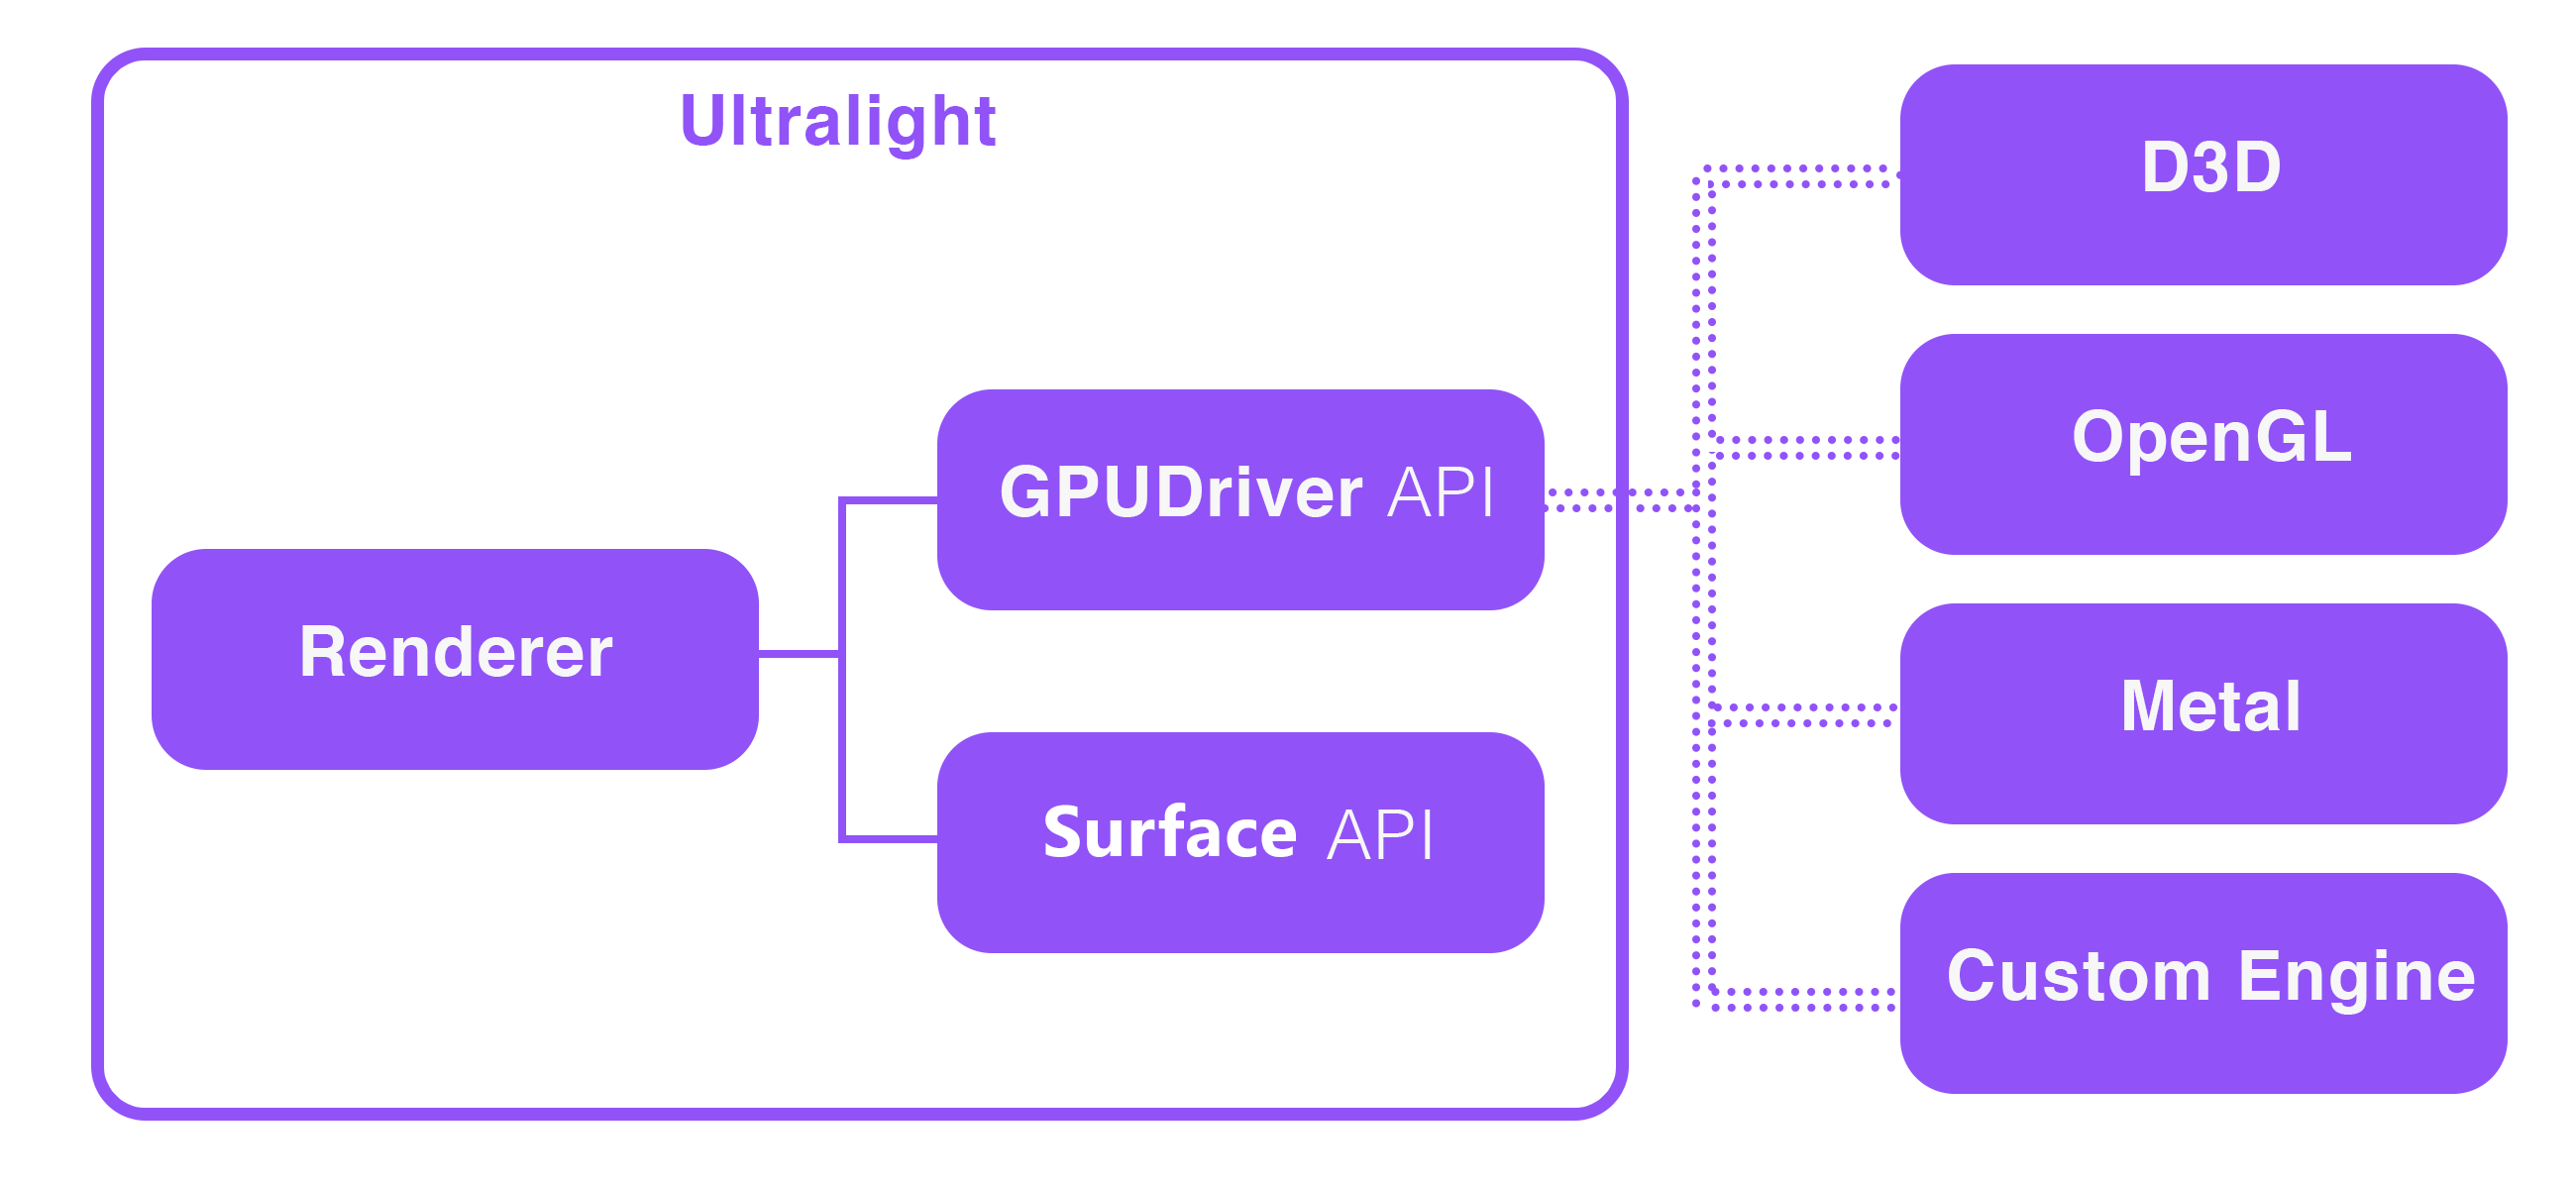
GPUDriver API
The first step to using a custom GPUDriver is to subclass the GPUDriver interface and override all the virtual functions.
You'll need to handle tasks like creating a texture, creating vertex/index buffers, and binding shaders.
All calls to the GPUDriver interface are dispatched during Renderer::Render() but drawing is not performed immediately-- Ultralight queues drawing commands via GPUDriver::UpdateCommandList() and expects you to dispatch these yourself.
- For porting to Direct3D 11, see: AppCore/src/win/d3d11
- For porting to Direct3D 12, see: AppCore/src/win/d3d12
- For porting to OpenGL, see: AppCore/src/linux/gl
- For porting to Metal, see AppCore/src/mac/metal
Using the GPU Renderer
Set up Platform Singleton
You should notify the library of your custom GPUDriver implementation by calling Platform::instance().set_gpu_driver() when setting up the Platform singleton.
#include <Ultralight/Ultralight.h>

using namespace ultralight;

void InitRenderer() {
  // Pseudo-code to create our custom Platform implementations
  MyGPUDriver* gpu_driver = new MyGPUDriver();
  MyFileSystem* file_system = new MyFileSystem();
  MyFontLoader* font_loader = new MyFontLoader();

  // Notify the Platform singleton of our implementations
  Platform::instance().set_gpu_driver(gpu_driver);
  Platform::instance().set_file_system(file_system);
  Platform::instance().set_font_loader(font_loader);

  // We can now create the Renderer singleton
  Ref<Renderer> renderer = Renderer::Create();
}
Enable GPU-Acceleration on a View
Views are unaccelerated by default (ie, they use the CPU renderer and paint to a Surface).
You should set ViewConfig::is_accelerated to true when creating a View to have it use the GPU renderer and paint to a RenderTarget instead.
RefPtr<View> view;

void CreateView() {
  ///
  /// Create our ViewConfig with GPU acceleration enabled.
  ///
  ViewConfig view_config;
  view_config.is_accelerated = true;

  ///
  /// Create an HTML view, 500 by 500 pixels large.
  ///
  view = renderer->CreateView(500, 500, view_config, nullptr);

  ///
  /// Load a raw string of HTML asynchronously into the View.
  ///
  view->LoadHTML("<h1>Hello World!</h1>");
}
Shader Programs
Ultralight relies on vertex and pixel shaders for CSS transforms and to draw things like borders, rounded rectangles, shadows, and gradients.
Right now we have only two shader types: kShaderType_Fill and kShaderType_FillPath.
Both use the same uniforms but have different vertex types.
Here are the reference implementations for Direct3D (HLSL):
| Vertex Shader (HLSL) | Pixel Shader (HLSL) | |
|---|---|---|
kShaderType_Fill | v2f_c4f_t2f_t2f_d28f.hlsl | fill.hlsl |
kShaderType_FillPath | v2f_c4f_t2f.hlsl | fill_path.hlsl |
If your engine uses a custom shader language, you'll need to port these files over.
Blending Modes
Ultralight uses a custom blend mode-- you'll need to use the same blending functions in your engine to get color-accurate results when dispatching DrawGeometry commands with blending enabled.
For reference, here is the render target blend description for the D3D11 driver:
  D3D11_RENDER_TARGET_BLEND_DESC rt_blend_desc;
  ZeroMemory(&rt_blend_desc, sizeof(rt_blend_desc));
  rt_blend_desc.BlendEnable = true;
  rt_blend_desc.SrcBlend = D3D11_BLEND_ONE;
  rt_blend_desc.DestBlend = D3D11_BLEND_INV_SRC_ALPHA;
  rt_blend_desc.BlendOp = D3D11_BLEND_OP_ADD;
  rt_blend_desc.SrcBlendAlpha = D3D11_BLEND_INV_DEST_ALPHA;
  rt_blend_desc.DestBlendAlpha = D3D11_BLEND_ONE;
  rt_blend_desc.BlendOpAlpha = D3D11_BLEND_OP_ADD;
  rt_blend_desc.RenderTargetWriteMask = D3D11_COLOR_WRITE_ENABLE_ALL;
Render Loop Integration
Within your application's main run loop, you should:
- Call
Renderer::Update()as often as possible - Call
Renderer::RefreshDisplay(0)andRenderer::Render()once per frame.- The renderer will call into the
GPUDriverinterface during this time synchronize textures, render buffers, geometry, and command lists.
- The renderer will call into the
- After calling
Renderer::Render(), you should consume any pending command lists (all drawing is performed via command lists). - Get the texture handle for each
Viewand display it on an on-screen quad.
void UpdateLogic() {
  // Calling Update() allows the library to service resource callbacks,
  // JavaScript events, and other timers.
  renderer->Update();
}

void RenderFrame() {
  renderer->RefreshDisplay(0);
  renderer->Render();

  // Pseudo-code, consume any pending command-lists in your GPUDriver here.
  gpu_driver->DrawCommandListIfNeeded();

  // Pseudo-code, draw any View textures to on-screen quads here.
  DrawViewQuadsToScreen();
}
Getting the View Texture
Ultralight doesn't draw anything to the backbuffer-- all Views are drawn to an offscreen RenderTarget that you can display how you wish.
Just call View::render_target() to get the render target for a View.
RenderTarget rtt_info = view->render_target();

// Get the Ultralight texture ID, use this with GPUDriver::BindTexture()
uint32_t tex_id = rtt_info.texture_id;

// Textures may have extra padding-- to compensate for this you'll need
// to adjust your UV coordinates when mapping onto geometry.
Rect uv_coords = rtt_info.uv_coords;
Once you have this texture you can display it on-screen as a quad or projected onto some other geometry in-game.
Updated about 1 year ago